The search pages use the minimal.master
master page per default. This is a very simple master page with next to
nothing on it, not even navigation. This is also one of the most
frequently recurring issues people are experiencing, as navigation
almost always is an essential part of a corporate web site. The Office
Web Applications also use this master page, but for those applications,
it makes sense not to include navigation, because it provides more
screen real estate, which is a bigger issue for the applications.
Here we will look at different
methods for manipulating the search center's layout, exemplified by
showing a number of ways of adding navigation to search centers. We also
look at how to apply an already existing master page to the search
center and some issues related to that. The different techniques applied
to solve the navigation issue can also be applied to solve other layout
and interaction-related problems.
Which method to choose for solving a particular problem is dependent on a number of decisions, especially the following:
Is the change required throughout the farm or only on a single page or site?
How often is the change expected to require updating or other maintenance?
Should the change automatically apply to newly created pages or be added manually by the site owners and administrators?
It should always be a carefully
considered decision which method to use, as redoing it using one of the
other suggested methods can require significant work. Firstly, the
techniques are so different that almost nothing is re-usable. Secondly,
undoing already applied changes based one method before applying a
solution based on another method can be tedious and time-consuming. It
should also be considered that site owners and administrators might
require training depending on the change.
The following are suggestions on when to apply the proposed methods for modifying the layout, in this case adding navigation:
Adding a custom navigation Web Part to pages:
Using this method, it is commonly the responsibility of the site owner
or administrator to manually add the Web Part. This makes it a very
administrative-heavy solution. This can be negated by creating custom
site templates that include this Web Part. It does not, however, solve
the issue with maintenance if the Web Part is to be removed at a later
time, as only future sites would reflect the change. This is, however,
also true for all standard SharePoint sites, so it is a well-known
issue. In any case, this solution is most suitable for situations where
the change should be applied to only certain types of sites or specific
sites.
Modifying the minimal.master master page to include navigation:
Making changes at the master page level makes the change both easy to
manage centrally and easy to alter and maintain. It does, however,
remove the option to control it at site level, unless specific master
pages are created for the relevant sites. In a corporation where site
content and layout often need some degree of central administration,
this is the suggested method.
Editing the SearchMain.aspx pages to include navigation: Editing the .aspx
pages themselves can generally accomplish the same things as changing
the master pages. It actually offers more flexibility and control over
the layout. The benefit of this method is that it allows a change to be
applied to all pages on a specific site, without affecting other sites.
It is also easy to maintain and update, as any changes will affect both
existing and future pages on that site. It does, however, remove the
ability to centrally administrate the change, and it makes farm-wide
deployment more time-consuming.
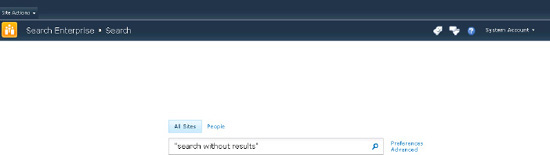
1. Adding Home and Back Buttons to the Search Result Page
When you create a
SharePoint 2010 Search Center, one of the first things you'll notice is
that there is no navigation to allow the user to go back to where the
user came from or to go to the parent site or top site as seen in Figure 1. Obviously the Back button in the browser could be used, but the user should be able to do this from the SharePoint UI itself.
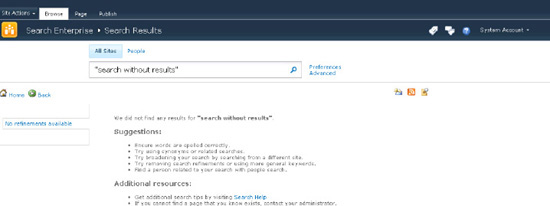
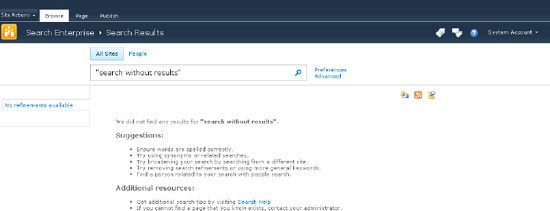
Many use cases can be thought
of when determining if this is a real issue. The most common case is
when the user searches for something and does not find any desired
results (Figure 2). This could be done from either a search page or using the search box located on many sites, such as Team Sites, etc.
One way of solving this is to use a Content Editor Web Part that includes Home and Back buttons that are added to the results.aspx and people.aspx
pages. This technique can also be used for a number of other purposes,
such as providing quick links or helpful info, but here the focus is on
adding dynamic navigation to go back or home.
On the Results.aspx
page, edit the page and add a Content Editor Web Part. The suggested
location is to add it to the left Web Part zone. Give it a meaningful
title (e.g., Navigation buttons), and set the Chrome Type to None. Add
the necessary icons and text to make it look as required. For the text,
that could be Go Home for the home button and Go Back for the back
button. For easier deployment, use the existing images from the
SharePoint layouts folder. That could be /_layouts/images/hhome.png for the Home icon, and /_layouts/images/back.gif for the Back icon.
Setting the URL for the Home
navigation is easy. Just set it to "/" to set it to the site home.
However, for the Back button, a little trick is required. Link it to href="#", and set the click behavior as onClick="history.go(−1)".
Now the navigation on the Results.aspx page is finished. To avoid repeating this on the People.aspx page and other pages where the Home and Back navigation Web Part is useful, it can be stored as a re-usable Web Part.
Export the new Content Editor Web Part to your desktop.
Upload
the saved Web Part to your Web Part gallery. (In the Site Collection
Root, click Site Actions, click Site Settings, and then click Web
Parts).
Give the Web Part a useful name and description, and categorize it.
Edit the People.aspx page, and add a Web Part, but this time choose the Web Part that is now in your gallery.
An alternative way to deploy this Web part is to copy the following Web Part markup in Listing 1 into a text file, change the file extension to .dwp, and then upload it to the Web Part gallery so you can re-use it.
Example 1. Navigation Buttons Web Part Markup
<?xml version="1.0" encoding="utf-8"?>
<WebPart xmlns:xsi="http://www.w3.org/2001/XMLSchema-instance"
 xmlns:xsd="http://www.w3.org/2001/XMLSchema"
xmlns="http://schemas.microsoft.com/WebPart/v2">
  <Title>Site Navigation Buttons</Title>
  <FrameType>None</FrameType>
  <Description></Description>
  <IsIncluded>true</IsIncluded>
  <ZoneID>LeftZone</ZoneID>
  <PartOrder>0</PartOrder>
  <FrameState>Normal</FrameState>
  <Height />
  <Width />
  <AllowRemove>true</AllowRemove>
  <AllowZoneChange>true</AllowZoneChange>
  <AllowMinimize>true</AllowMinimize>
  <AllowConnect>true</AllowConnect>
  <AllowEdit>true</AllowEdit>
  <AllowHide>true</AllowHide>
  <IsVisible>true</IsVisible>
  <DetailLink />
  <HelpLink />
  <HelpMode>Modeless</HelpMode>
  <Dir>Default</Dir>
  <PartImageSmall />
  <MissingAssembly>Cannot import this Web Part.</MissingAssembly>
  <PartImageLarge>/_layouts/images/mscontl.gif</PartImageLarge>
  <IsIncludedFilter />
<Assembly>Microsoft.SharePoint, Version=14.0.0.0, Culture=neutral,
PublicKeyToken=71e9bce111e9429c</Assembly>
<TypeName>Microsoft.SharePoint.WebPartPages.ContentEditorWebPart</TypeName>
<ContentLink xmlns="http://schemas.microsoft.com/WebPart/v2/ContentEditor" />
<Content xmlns="http://schemas.microsoft.com/WebPart/v2/ContentEditor"><![CDATA[<br/>
<a href="/"><img src="/_layouts/images/hhome.png" border="0"/></a>
<a href="/">Home</a> <a onclick="history.go(−1)" href="#">
<img src="/_layouts/images/back.gif" border="0"/></a> <a onclick=
"history.go(−1)" href="#">Back</a><br/><br/>]]></Content>
<PartStorage xmlns="http://schemas.microsoft.com/WebPart/v2/ContentEditor" />
</WebPart>
|
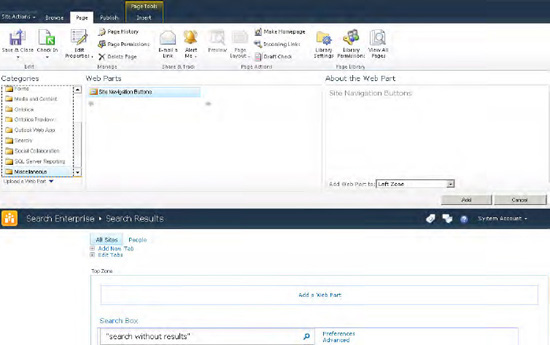
To add the Web Part to a search
result page, simply click the Web Part zone where the Web Part should
be added and pick the newly created Site Navigation Buttons Web Part as
seen in Figure 3.
The result should look similar to the one shown in Figure 4. Remember that this Web Part can also be used on other pages to keep a uniform look and feel.